Sunday, April 11, 2021

How to Drift Align Using ASIAir


V1.5.3

While ASIAir has a great polar alignment (PA) routine, some people do not have a clear view of the north or south pole even within 30 degrees of it, the limit of the PA routine.   So how does one get polar alignment?  An alternative is a manual method called drift alignment.  This is how we did polar alignment in prehistoric days but today remains the method used by permanent observatories around the world.  With a lot of patience you can obtain perfect alignment and require only minimal guide corrections in RA or if you can use PEC mode in your mount maybe not even need to guide anymore. For the rest of us who want to get set up an imaging quickly this can be just as good as a polar scope or using the ASIAir PA routine. 

There is some preliminary set up that can help speed things up.  First you must have a clear view to the south along the meridian within 10-20 degrees of the celestial equator (if you use the south pole then you will want a northern view and use the ecliptic there.  The process is the same.).  The closer the better but use what you have.   Next you need to have a clear view of the east or west horizon within 30 degrees of the horizon is ok but again along the celestial equator line.  These two areas will be used to adjust the mount altitude and azimuth. 

Now using your main scope with imaging camera attached, turn on the asiair crosshairs under the tool icon. Then go into focus mode which gives you more magnification and faster refresh rates.  Choose a star near the meridian along the celestial equator and center it on the cross hairs.   Now you can use the slew controls to move the star near the edge of the field.   Now rotate the camera in the scope so one of the cross hairs align on the star.   This should get your cross hairs lined up with RA and Dec to make the declination drift easier to see.   You can slew a bit in RA to see which crosshair is associated with ra drift and which is dec. You can also do this with your guide scope as it may be easier to rotate that to get the axis aligned. Just make it your primary camera for the duration of this exercise.

Now we are ready to begin.  Since we started the setup using a star near the meridian lets start with that.  Using the slow motion slew controls (less than 4x on the speed slider).  Adjust the the star position so its centered on the cross hairs.  If you want you can also move the green focus box to a star and center the tiny green crosshair on it.  It doesn't matter as long as you can determine star movement along the declination axis line.  Tracking should be on but guiding should be stopped.  Watch over a period of minutes to determine which way the star drifts. The further you are from the pole, the faster it will drift so likewise the closer you get the longer you have to wait.  Now that it has drifted, you will want to use the azimuth controls on the mount to move the star back to the RA line.  You will repeat this until the star stops drifting or starts drifting the other way in which case you have over corrected and need adjust it the other direction.  Continue the process until you can run about 10 minutes without any drift.  This should be good enough to allow guiding to make corrections over the long term.

Now with the azimuth alignment complete, lets move to the altitude adjustment.  Select a star in the east or west within 30 degrees of the horizon along the celestial equator.  Now center the star on your crosshairs and repeat the procedure as before.  This time adjust your altitude setting to bring the star back to the RA line.  It is always best when lowering the altitude to overshoot a little and end with the adjustment pushing the mount upward.  This takes out any slack in the mechanics and ensures it stays in place.  Repeat this process until the star doesn't drift for a period of 10 minutes.

For those with permanent piers you should strive for as perfect alignment as you can.  Spend one night doing just one axis and target for no drift over the course of hours.  Do the next axis the following night.  You may be able to get away without guiding at all and using just the mounts PPEC routine for RA.  For those that set up and take down nightly the 10 minute rule is sufficient.  With practice this can be done in  about 30 minutes or less but plan for an hour or more the first time.

To summarize:

Choose a star within 10-20 degrees of the equator lying near the meridian.  Use the azimuth controls to move the star back to the RA line.  Repeat until you see no drift long the declination line over 10 minutes.

Next choose a star less than 30 degrees above the east or west horizon near the celestial equator.  Use the altitude control to bring the star back to the RA line.  Repeat until you see no drift along the declination line over 10 minutes.

Drift align is not very complicated but it does take a while to complete.  Using a higher magnification or adding a barlow into the optical path can speed up the process as the drift will be more apparent in a shorter time period.


Friday, April 9, 2021

How to Autofocus with ASIAir


V2.1 - 2/21/2023

Just an update that EAF firmware version 3.3.7 now adds support for a maximum step count of 600000.  This should help hyperstar users who switch back and forth between native mode and require 120k+ steps to reach focus.


V1.5.3

One recent feature that is still being improved is autofocus.  Using the ZWO EAF you can electronically focus your telescope and now it can be done automatically.  The EAF is attached to your telescope focuser either with the included bracket or with a custom bracket.  If you are handy you can even make one on your own.  Before AF can work efficiently you must ensure that the shafts are locked really good.  Most shafts including that on the EAF have a flat side that must have a set screw torqed properly against the flat to reduce backlash. As of this writing, ZWO has released a new EAF that runs off USB power.  The original version required 12V and a USB connection.  I have been told that the mechanics and gearing are the same so should be interchangeable.

Everyone is familiar with autofocus on their cameras or phones.  These work great with bright daytime scenes but don't work well or at all under low light levels.  With telescopes the current method utilizes multiple exposures while advancing the EAF motor in fixed steps to plot a vcurve similar to the one shown at the top of this page and is based on the size of stars in the field.  You first must start with an image that is in eyeball focus.  Then, a dozen or more shots are taken and are run through a formula to determine the curve.  The curve is an approximation, but the apex should represent the position with the best focus.  Lastly the routine will do a short validation test taking 3 or 4 shots near the apex to select the best possible position of the motor.  The curve will never be precise due to atmospheric seeing.  However, we are not shooting for precise.  We really want to know where the bottom of the vcurve is.  This point represents the EAF position that should result in the lowest HFD or smallest star size.  This is the red dot shown in the first image here.


So this explains how it functions.  So how do we use it?  In principle it is very easy.  The autofocus settings are located under Focuser Settings.  There are two main settings that affect how well AF works, AF Exposure and Step Size.  The AF Exposure setting here is the default AF exposure. The exposure used depends largely on what filter if any you are using.  Shorter exposures generally work best. However with narrowband or broadband filters exp of 1-3 seconds wont work very well.  In those cases you want to use 3-4X what you would use with a luminance or no filter.   Because each scope is different you have to try different exposures to see whats best.   If you use an EFW filter wheel, you will notice now that each filter has its own AF exposure time.  This is set under the filter wheel configuration screen.  This allows you to set custom exposures based on the current filter used. 


The next setting is Step Size.  This is the number of EAF motor steps that will advance between AF exposure tests.  This can be useful to tune the AF sequence when you have custom setups where the default of 30 steps is not correct.  Examples for changing this are when you have connected the EAF to your 10 to 1 fine focus shaft.  You could multiply the default by 10 to make it 500 steps.   Another example would be if you use a homegrown belt system to focus your Redcat or camera lenses.  Or maybe you just want to speed up the AF sequence and are ok with a little loss of precision.   Whatever the reason this setting can help you tune the AF for your particular setup.  My C11 Edge with a Feathertouch focuser uses 60 steps.

The other settings dictate when asiair should start an AF sequence.  These are pretty self explanatory so I wont detail them here.  Just note that these can be used in combinations so that any activated trigger will kick off an AF.  If a trigger is met, asiair will wait until the end of the current image before initiating the AF sequence.  

I will add a note here about temperature changes.  The EAF contains an internal temp sensor which can be used to monitor for environmental changes.  A remote temp sensor can be added for focusers that have a slot for such a sensor.  I have also been inclined to add a remote temp sensor into the rear cell of my SCT to monitor the change internally to the OTA.  In most cases you can just use the internal EAF sensor.  Also its important to note that these sensors are NOT calibrated.   They will not accurately measure the outside air temperature. All we are concerned about is the change in temp not the absolute value. 

You can initiate an AF routine manually by clicking the focuser icon on the left side of the screen and then clicking AF.  Clicking the play icon starts the routine. The process can be stopped by pressing the stop icon.  The settings described previously are only used when an Autorun sequence is running.  Otherwise you must conduct the AF sequence manually. 

The other EAF settings such as fine and course have no effect on autofocus. Currently the backlash setting is only used when manually focusing using the on screen controls or EAF hand paddle.  Exposure and step size are the only settings that control how AF works.  Its important to get them right.  This may change in future releases but ZWO currently wants to keep it simple. 

If you are getting error messages that the EAF moved less than 900 steps then you need to increase your step count by 5 or 10 at a time until you have success.   Smaller step sizes will generate a more precise curve but will take much longer to complete.  Conversely, using a step size too large will generate a curve quickly but will not be very accurate.  Use a step size that will take at least 12 sample points then compare a number of preview images. If your precision is still off then decrease the step size by 5 or 10 and try again.  Try to use as large of a step size as you can and still get consistent results.  Dont go overboard on the step size.  Increase it by 10 each time and see how it performs.   Every system will be different. 

The ASIAir autofocus is evolving and expect to see improvements in the function with each new release. 

Tuesday, March 9, 2021

ASIAir Power Ports

 V1.5.3


With the introduction of the ASIAir Pro, four 12V power ports have been added and made possible by a custom power board that piggy backs onto the main cpu board.  Each port accepts a standard 2.1x5.5mm plug and the product includes 4 power cables to use with your various astrophotography equipment.  The ASIAir supports a total of 6A or 6 amps total across all four ports plus the ASIAir itself.  Each port can only support 3A of power as long as the total power consumed doesn't exceed the 6A.  Most devices will have an amp rating in their specifications that represents the maximum power the device will consume with all features in use cranked up to the max.  Amp ratings are additive so take all of your devices and add up the amp ratings to get the maximum power that can be consumed.

There are many uses for these power ports but ZWO does not recommend plugging your mount into a power port.  Most mounts consume too much power especially when slewing and can cause the ASIAir to go into fault mode and shut down or cause other operational issues.  Please purchase a splitter cable to use to split power from your source, one to the mount and one to ASIAir.  Suitable mounts to use with a power port would be those low power devices that only track in RA.  Check the power specs on the mount to make sure it does not exceed 3A maximum.

TIP: Choose a power source that is twice the capacity of what you need.  If all of your equipment totals up to a maximum draw of 5A to include the mount you just split off, then use a power pack that is rated at 10A.  The reason for this is that most of these power supplies are switching power supplies and when they start to reach their maximum rating they get really hot and they also can produce noise on the power wire.  This can often cause electronics to do strange things or crash or can cause noise in your images to appear. The best power sources are batteries, battery packs, or what are called linear power supplies.  Fortunately switching power supplies are now cheap even at twice the capacity needed so no need to skimp on the rating.

Now with the disclaimers out of the way, lets take a look at the options now available.  To access the power configuration, click on the wifi symbol at the top of the screen and select “Power Output”. Each power output can be given a name and some of these enable PWM or Pulse Width Modulation.  The available options at this time are:

Telescope - Full time 12v off/on

Camera - Full time 12v off/on

Dew Heater - 12v PWM 0% to 100%

Focuser - Full time 12v off/on

Flat Panel - 12v PWM 0% to 100%

Others - Full time 12v off/on

On some devices the list does not completely display and you will have to scroll to see the other options.  You would be surprised how many people miss this.

The PWM outputs are useful for controlling things like dew heaters to control the temperature at the scope, lens, or mirror or for a flat panel or other LED lighting used at the mount for setup or safety.  You should not use the PWM options for devices designed to require full time power.  Nor should you use PWM to reduce the output to power your DSLR.  Doing so will almost certainly damage your camera.  Use an appropriate 12V power adapter for this.  Remember 12V PWM is still 12v its just turned off and on at a very fast rate and made faster or slower by using the slider.  It does not vary the voltage.

The settings you choose are sticky and will reset to the on/off or PWM setting that were set previously upon boot up.  While its not a huge deal its important to know that when ASIAir boots up, all power ports get turned on briefly at full power until the configuration is loaded and settings applied.  This is usually only a few seconds but important because dew heaters will run at maximum and cause maximum start up current until PWM kicks in and cuts the power draw or some ports are turned off.  Its important to know the power requirements of your devices so you do not exceed the maximum that ASIAir can handle.

The case on the ASIAir is made of aluminum much to the dismay of wifi users.  The reason for this is because the case also acts as a heatsink or heat dissipator for the power board.  The more power that is needed, the hotter the case will get.  Be mindful if you decide to use sticky velcro to hold it to something that likely it will come unstuck when it gets hot.  Use the supplied finder foot or other screwed on attachment to fix it firmly to your scope or mount.

In summary, the total power draw of the ASIAir cannot exceed 6A or 3A on any one port!  Power requirements are additive so look up the specs and add up the maximum amp ratings.  The introduction of power ports opens up a lot of possibilities for controlling devices from the tablet or phone.  I use one power port for cooling fans to help cool down the primary mirror on my C11.  After 30 minutes I can turn off the fan power and start imaging.  Another port is used to control 12V LED lighting on the tripod legs.  With PWM I can safely control the brightness of the LEDs.  I use these for safety so I or others do not trip on the tripod legs or wires nearby in the dark.  I’m sure you will find other unique uses for these ports that will help in areas I haven't thought about yet.


Monday, March 8, 2021

Finding A Planet or the Moon with ASIAir


V1.5.3

I get a lot of reports from folks that ASIAir will not plate solve on planets or the moon.  The reality is that any object that moves against the stars cannot be plate solved.

Plate solving compares the field of view with recorded plates of known star positions to determine the exact position of the telescope.  An interloping planet or moon can mess up the ability to solve the location.  So what can we do?

The trick is to goto a nearby star or object that is in the asiair database.  This object should be within the same quadrant of the sky and as close as possible to your target.  For planets this is fairly easy.  Choose a star nearby and then do a platesolve and then sync the location.  If you have autocenter enabled then this will be done for you.  I recommend that for planets and the moon you disable goto autocenter and do the platesolve and sync manually.  Once the star goto has completed and has been solved and synced, goto the star again and make sure it it is in fact centered.  Then goto the planet thats nearby and the planet should be reasonably centered.

The process for the moon is the same but the brighter the moon is the more difficult it will be to get that nearby star platesolve completed.  As long as you can achieve a platesolve and sync on a star somewhere in the same quadrant as the moon or worst case same hemisphere as the moon you should get reasonably close.  Try different exposures or filters if the moon interferes with the platesolve.  

The idea here is that you really dont want to do your platesolve on the other side of the meridian from the target.


Friday, March 5, 2021

ASIAir Pro Live Stacking


V1.5.3

Live Stacking is a feature only available to the ASIAir Pro.  This is due to the faster processors and IO buss currently used in the device.  Live Stacking is an incredible feature that grows on you the more you use it.  In this age of instant gratification, it is incredibly rewarding to watch your image build one exposure at a time as it happens all in real time.

One can just start a live stack and get instant success.  However, with a little prep ahead of time one can prepare calibration frames and have them applied in real time as the image is stacked. 

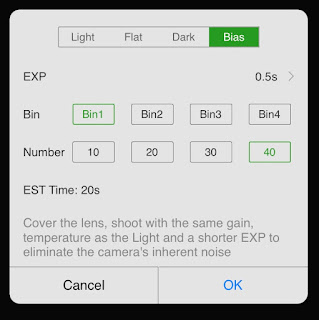
To get started we need to prepare our calibration frames bias, dark, and flat frames.  ASIAir will automatically stack each once we get things rolling.  The resulting stack will be added to the light frame setup and then enabled. Make sure that your calibration frames are all made using the same gain, BIN, and temperature setting.


Bias frames are really important if you are using a dslr camera.  Dslrs are not really designed for astrophotography and so no attempt is made to improve the sensor read noise because usually pictures of Fido are so bright that it just swamps all of the read noise and its not a problem.  But for astro work this read noise can be devastating.  To get rid of the bias read noise and banding, we take a series of very short exposures, as short as the camera will allow, with the scope covered.  The resulting data is JUST the read noise.  For astro cameras like the ASI series, the noise is so very low already and with cooling its virtually non existent that bias frames are not necessary and in fact could add noise to the image. If you are using an ASI  astro cam then just skip the bias frames.  To set up for a bias stack, cover the scope or lens and then edit the live configuration.  The configuration window will appear with 4 tabs at the top.  Select Bias.

For the exposure this will be very short, the fastest exposure your camera will support.  For BIN you should use the BIN setting you plan to use to shoot your target.  If you are not sure then just use BIN1 for everything.  ZWO has a white paper on BIN settings if you want to learn more.  For the number of frames just use the maximum of 40.  When done, click OK and then star the live exposure.  The bias stack will build and when 40 have been stacked it will automatically save the master bias into the Live folder.


Next we will do the same with dark frames.  In the live configuration screen select the dark tab.  The set up is similar to bias but we now want to use the same exposure time that we will use for the light frame. In the example image this shows as 300s but it should be 120s to match the light exposure we will be using.  You can figure out the best exposure to use by trying some preview frames of your target to get your desired exposure.  If time permits you may want to make several dark stacks at different exposures to have for future use.  Select the maximum number of frames and begin the live stack.  When its complete it will save the master dark to the live folder.

The last calibration frame needed is a flat frame.  I strongly suggest you read my other blog on using the new AutoFlat option.  There is a lot of information there that is helpful for successful flat creation.  Once you have mastered the creation of flats, you will set up the flat options in the live configuration panel under the flat tab. As with the others, select the exposure or Auto if using AutoFlat, the BIN setting used and the maximum number of frames.  Once complete, start the live stack and the master flat will be stored in the live folder when done.


Now we are ready to set up our light frame.  Once in the live configuration panel, select the light tab.  Here you will select the exposure time, BIN setting, and stack duration.  Here you can select the number of frames to stack, or no limit.  With no limit, live will keep stacking until you pause it.  The image will only be saved once you select the image save option on the lower right of the screen.

Below these settings are the options for selecting and enabling the calibration frames to use.  Tap the > symbol for each calibration type and select the saved master calibration stack you created earlier.  Complete this for each type bias, dark, and flat.  These will not be enabled by default.  You must select each one by clicking the box to the left of the file name.  If you want to run a stack without a calibration file, just deselect it here.  The last option is save every frame when stacking.  This will save each frame as its taken so you can stack it with other software later.


Once these have been set its show time.  Go back to the preview screen and go to your desired target and get it framed as desired, focused, and then start guiding.  Go back to live mode and start the exposure.

If you set a fixed number of frames to stack, the asiair will continue until all frames have been stacked and the image will be saved in the live folder.  If you selected no limit, the stack will continue until you stop it.  It will not be saved until you select the download icon at the bottom right.

If you stop a stack, you can resume it again.  This is helpful if you need to dodge clouds, aircraft, or starlink satellites.


Currently there is no way to combine mono images taken with different filters.  You can stack them individually with live but they will need to be registered and combined with other software. If you plan to livestack using filters, don’t forget to make flat frames for each filter.  Then select and enable them before shooting your light frames.

Live stacking is a rewarding experience that gives instant gratification.  The more i use it the more I prefer it for short term projects.  I’m sure you will find it just as enjoyable  


Thursday, March 4, 2021

ASIAir - AutoFlat Frame Exposures


V1.5.3

This version of ASIAir introduces a new feature I call AutoFlat. Before i go into how to use this let me explain a little about flats and how we used to calculate the proper flat exposure. 

Flats are used to map out vignette, gradients, dust, and other filter variants.  This data is then applied to your target light frames to balance the gradients and remove dust and other optical imperfections so that the resulting image is flat and evenly exposed without the defects of the optical system.

Typically folks use layers of tshirts against the sky, led flat panels, EL or electroluminescent panels, or light boxes.  Some have even used their ipads.  The idea is to use a known even illumination source so gradients and dust can be recorded.  The trick is obtaining the proper exposure.  Previously it was common knowledge to use what is called 1/2 full well.  Some have suggested to use 1/3 full well but like anything we do there are plenty of folks to challenge every step.  The process of calculating this exposure is to slowly ramp up your exposure until your average ADU value shown on the preview screen just reaches 65534 or the maximum value for your camera.  Basically its the exposure where this value doesnt increase anymore.  For 1/2 full well we would take exactly one half of this exposure time.  The 65534 value represents the point where the pixels on average have been fully saturated and will record no more photons; a full well.  Half of the exposure time will record one half full well.  If you are in the 1/3 full well family then you would take 1/3 of the exposure time.  This would then be your ideal flat exposure time.  It is not 1/2 ADU or the middle of the histogram.

So in reality, this is really only important for the purists.  ASIAir makes this legacy model easier since we can immediately see the ADU value on the preview screen.


With 1.5.3, ZWO introduced Autoflat.  When you set up the autorun tile for flat exposure you will find there is now an Auto option for the exposure.  There are some limits however.  ZWO has introduced a 10 second exposure limit. If your exposure time hits 10s them you need to increase the brightness of your light source.  There can be a lower limit with some cameras.  There have been reports that some cameras show banding with exposures shorter than 2s.  This is something to watch out for.  So for this to work reliably, your exposure should be between 2 and 10 seconds when using auto.  

I requested a higher limit like 30s but was told 10s was enough.  Lets hope they bump this up in the future as its difficult to run flats for an entire wheel of filters if you have lum, rgb, and narrowband filters in the same wheel.  For now you just have to run them separately.

Now, folks have also abandoned bias frames with asi cameras in favor of using flat darks.  This is due to the banding issue mentioned earlier.  Flat darks are the same exposure as the flats but with the scope covered.  Fortunately ZWO added a way to do this. After running the flats, go into autorun and reset the autorun, go into the flat tile and click the exposure edit icon.  The previous auto exposure will populate the


exposure field.  Now you can select bias or dark as your image type.  Your choice.  Cover the scope and run the sequence again.  You now have your flat darks.  If you are using a DSLR please use true bias frames, not flat darks.

One will notice that the histogram does not show the hump at the manually calculated 1/2 full well.  I’ve been told that this is due to the exposure being calculated before white balance has been applied and before debayer for an OSC camera.  Honestly I have never seen an issue between a variance here in the fractional full well used except in cases where there are extreme gradients.  The important thing is that for all filters used that the fractional full well value is the same for all filters, somewhere between 1/3 and 1/2 full well is fine, to help with color balance when all are combined to produce a color image.

Previously getting the correct flat exposure was a painstaking effort that needed to be performed whenever you changed gain and filters.  With the introduction of Autoflat this has been made quite a bit easier to accomplish.  Currently this is limited to exposures between 2 and 10 seconds.  You can vary the light intensity to get you in that range.  One option is to use frosted lexan or plexiglass or for very bright led tracing panels you can use cling on window tint from the auto parts store.  Find some that have 20% transmission and are neutral grey in color.  It comes in rolls 2ft x 12ft for only 12.00US.  Just cut with scissors and tape to your led panel.  Stack layers if you need even more light reduction.

One last tip.  If you are using a LED flat panel or light box and normally orient the scope vertically to keep them in place, be sure to park the scope to the home position.  This will set the scope to a known position you can reset to after the flats are taken, disable tracking, and prevent an automatic meridian flip if that is enabled in autorun.  May be a good idea to just turn that off when shooting flats this way.  You dont want any movement to cause your equipment to slide off and get damaged.

I hope this has been helpful and simplifies your calibration workflow.


Monday, March 1, 2021

How To Set Up Automeridian Flip in ASIAir


V1.5.3

With the introduction of ASIAir version 1.4, a new feature is available called Automeridian Flip often referred to as AMF.  During an imaging sequence using autorun, the mount will now automatically flip the telescope to the other side of the mount once the target has crossed the meridian. In addition this function is available even when using SkySafari to goto and frame the target image.

Under mount settings there is a setting to control the Center Exposure TIme (1s-10s). For most setups the exposure time can be set from 1s-3s. However, if you are using narrow band filters you should set this to 10s to ensure enough stars are recorded to allow the system to plate solve the image before and after the flip.

Automeridian Flip is currently only available when imaging a sequence using Autorun. The autorun page now displays how long it will be before the meridian flip will take effect. When the target reaches the meridian, autorun will pause imaging and tracking will stop. The amount of time it waits for this to happen is based on a couple of settings and the programmed autorun exposure currently being executed.

The first setting is “Stop tracking x min before Meridian”.  This is useful to stop everything to prevent your scope or camera from hitting your pier or tripod.  The second option, “Do AMF x min after Meridian”, is similar but controls the time to do the AMF after the target crosses the meridian.  Again, this is to prevent the equipment from hitting the pier or tripod on the other side.

The last option, “Recalibrate Guiding after AMF”, will clear the guide calibration data and start the guide calibration sequence.  This is sometimes needed for mounts with backlash that differs after AMF.  The recalibration ensures backlash is measured and added to the correction pulses to improve guide response.

Once the flip has completed, the goto will be plate solved and adjusted to recenter the target precisely to where it was prior to the flip. The image will however be inverted. At this point guiding will autoselect a guide star, flip the guide calibration data or recalibrate if selected, and begin guiding. The imaging sequence will then resume.

Automeridian flip further enhances the ASIAir to minimize the interaction needed to complete an imaging sequence.


What the Heck is Platesolving?


V1.5.3

On the ASIAir, platesolving is the process used to determine where the exact center of the image is pointing.  The process involves taking a preview image and clicking the plate solve button.  This starts a comparison process of “plates” stored on the ASIAir.  It doesn't need the internet to do so.  Once the solve has completed you will be presented with some options to sync or sync and goto.  Sync will just update the ASIAir so that it now knows exactly where the scope is pointed.  The next goto should get your object centered perfectly.  Sync will also update the position in Skysafari if you have that integration set up.  Sync and goto will just update the current location and then readjust the scope position to center the chosen object.

There is a limit to what ASIAir can platesolve.  The original ASIAir has a 0.4 degree limit which means the field of view along the short side of sensor must be greater than 0.4 degrees.  With the ASIAir Pro the limit is 0.2 degrees.   There are tools out on the internet to calculate the sensor field of view and this can also be done in Skysafari once your equipment and observing view are selected. It also cannot platesolve within 6 degrees of the pole.  However, the polar alignment tool can.

Other factors that can affect platesolve are not enough stars to match the plates or too many stars, too much math for the process to complete.  I have found that on average 200-600 stars seems to work well.  Adjust your exposure to increase or decrease the number of stars.

Its also important to get the main camera focal length precise.  Fortunately ASIAir has a great way to do this. Just enter “0” for the main camera focal length and it will calculate the focal length for you based on the camera used when you plate solve next time.

 Also note that you can do this with your guide scope as well if the field of view falls within the plate solve limits. Just temporarily turn off the main and guide cam in the app and then select your guide cam for the main camera.  Then enter “0” and do a plate solve.  Note the calculated focal length.  Swap the cameras back and enter the new focal length into the guide camera settings.  This will ensure your guide graph and rms error numbers are precise. 

There are a number of areas that ASIAir uses platesolving to get things on track.  One is called Goto Autocenter which will solve and reposition the scope to automatically center the object.  On the same screen you can preset the Center Exposure Time to use during this process.  Trial and error will determine which is best for your setup.  Without filters one or two seconds should be enough.  With narrowband filters this could go up to the Max depending on the filter used.  Its also useful if you have automeridian flip enabled.  After a flip the mechanics can cause the scope to be off and the autocentering allows the object to be recentered.

You can now also do a goto on a previously taken image and after a plate solve and recenter, allows you to resume a session on another day with minimal framing loss.

All of these features and enhancements will eventually lead to automated multitarget sequencing and hopeful some form of mosaic planning.  Its not there yet but you can see where all of this helps with that.

So what happens when you use filters?  For most light filters such as LRGB there is not much difference in star intensity.  When you use narrow or broadband filters they are so dense that you have to increase your exposures to record enough stars.  Usually 5 to 10 seconds will be enough depending on your scope and filter used.

Platesolving is key to successful use of many functions in ASIAir and totally negates the need for a finder scope.  The plates used to compare to your image are built into the product and it does not require internet access.  The exact location of where your scope is pointing can be completed in seconds and allows your gotos to center the object perfectly.


Monday, February 22, 2021

How To Adjust ASIAir Guide Aggression

 V1.5.3

Why do we guide at all during astrophotography?  The ideal situation would be that we have perfect polar alignment (no drift in declination) and perfect RA drive gears (no periodic error in the worm gear).  In this utopian instance we would not need to guide.  Why you ask?  Because the most ideal guide ignores the effects of seeing and just corrects for the error I mentioned previously.  We don't want to make guide corrections when the star jumps around.  This often makes the image worse than doing nothing.  The solution is to tune the guide pulse and we do this by adjusting the guide exposure, guide pulse multiplier and aggression settings.


Lets talk about a few guide camera settings that will help get to the next steps.  Calibration step and Max dec and RA Duration. 

The calibration duration is simply a value that ensures that a star moves enough during guide calibration so that the axis orientation can be determined.   This should really only take a couple of minutes to complete for both axis.  A value too low will result in an error that the star did not move enough. A value too high will result in a star lost or too few steps completed.  The correct value is dependent on a lot of factors.  The largest factor is the focal length of the guide scope.  Wider field guide systems require the value to be higher so that the movement can be detected.  Conversely if your guide system uses a higher magnification such as when you use an off axis guider or use a barlow lens on your guide scope, this must be reduced.  The goal is to get enough movement in 4 or 5 steps to complete the axis test.   To start you can use this as a guide for some common configurations of guide scope focal length:

ZWO Mini Guide Scope (120mm FL) = 8000ms to 10000ms
Orion 60mm helical focuser guide scope (240mm FL) = 1500ms to 3000ms
Off axis guider (FL same as main scope) = 250ms to 500ms

Again these are just starting points and depending on cameras used it could be different. These should be used as starting points and adjusted so the axis completes calibration in 4 or 5 steps.

Max Duration settings should in most cases be left at the default settings.  PHD2 defaults are 2500ms for each.  Remember these values are Maximum values per guide pulse.  Pulses will more often be smaller in actual use.  So why would you want to change this?  The most frequent use case for reducing this value would be when there are transient issues occurring like wind gusts which would give a short term burst sending the guide star off very quickly but temporarily.  By reducing this value you can prevent the guide from over correcting on such events.   Normally I would just leave this at the default or around 2000ms to 2500ms.  On windy days you can try around 1000ms or less but be mindful that it could take more pulses to get the normal correction back on track. Obviously this is a bit of a trade off and focal length of the guide system will have an impact on the degree of change.  Using an OAG this could come way down to 500ms or less depending on the amount of wind.  Just try different values and see how the system recovers from wind or touching the tube for a second to simulate a wind gust. 


Now that you have your mount and guide session calibrated and have selected a star and started guiding, you will notice the guide graph at the bottom of the guide screen.  There is a lot of information here.  You have options to select the Declination Mode (upper left corner of the graph) and Corrections show or hide (upper right corner of the graph).  Dec mode is used to change how asiair corrects for drift in declination.  Options are off, north, south, auto.  If you are using a tracking mount that doesnt have a motor for declination corrections this should be off.  Most will start with Auto which will correct in both north and south directions. However once you figure out which way your declination drift is trending you can set it for north or south.  This will help by avoiding dec corrections in the wrong direction caused by large movement in seeing.   Corrections should

always be set to show.  I can’t think of any reason not to show corrections on the graph.  This is an important visualization to determine if guiding is too aggressive or not aggressive enough. 

Before we get into aggression settings, lets discuss what we can control.  The first thing to set is the guide exposure.  When we have really good seeing on the order of 0.25” we can use a shorter guide exposure on the order of 1-2s.  When seeing is really poor, the only way to help average seeing is to use a longer exposure like 2-4s.  This is because as the star moves around on a longer exposure it will make a larger star blob tracing out the movement of the star on the guide image.  Phd2 which is what ASIAir uses for guiding uses a centroid algorithm that calculates the center of the blob.  This is the best guess of where the star should actually be on average and where the measurement is made from.  This alone can greatly smooth the graph.  Its ok to start at 1s guide exposure to calibrate, get set up, and evaluate seeing.  But when its show time you should increase this 2-4s to get better results.


The next thing we can control is the guiding rate or guide pulse multiplier.  In ASIAir this is found under mount settings as .25x, .5x(default), .75x, and .9x.  The baseline guide pulse is the pulse sent to mount to keep things moving at the sidereal rate.  When a corrective guide pulse is issued, this setting will send a pulse as .25x the sidereal pulse, .5x , etc. Every mount is different and responds differently.  Most will find that .5x is perfect but not always so.  My Orion mount corrects best at .75x.  For some mounts these settings are not offered in the app and must be set on your hand controller.  You can determine which setting is best by setting both RA and Dec aggression to 50%.  Then try each multiplier setting and watch the total rms number.  Wait for the graph to measure the full width of the chart using the selected setting.  You can use 1s guide exposure for this part to speed up the process.  Choose the setting with the lowest rms error.  Note that as of version 1.5.3 this setting is not persistent and will reset to .5x at boot up.  Another thing to file in the back of your mind is to consider the guide pulse multiplier as a course setting and the aggression sliders as a fine tune setting.  As you try larger or smaller guide pulse multipliers you may need to decrease or increase the aggression to get the best guide.  If you find your aggression is too high or low you may need to adjust the multiplier to keep your aggression in the middle of the range.

Before we get too deep into aggression though, lets talk numbers.


Many folks starting out become fixated on RMS numbers.  So what is RMS. Its stands for Root Mean Square and in this instance its a measure of the seeing and mount error from a perfectly still star measured over a particular period of time.   You can Google RMS to learn the mathematical wizardry here.  But we will keep this simple.  RMS error is important but in most cases these numbers are limited by seeing conditions.   They translate to the approximate size of stars to expect over the given period of time. 

For reference there is a practical limit of seeing anywhere on the planet due to the atmosphere.  At high elevations (observatories) it may be possible to obtain seeing below 0.2 seconds of arc or 0.2”.   For most of us though 0.25” is pretty much the absolute lower limit.  Good seeing is about 0.5” to 0.7” and average is between 0.7” and 1.0”.   You can still image up to 2.0” but stars will be larger and you might benefit from binning.  That will be discussed another time. ZWO has a white paper on their site that discusses binning properties with their CMOS cameras. Any time you get seeing below 0.5” consider yourself lucky.

Now that you have an understanding of target numbers note that these can change over hours minutes or even seconds.  Atmospheric seeing is what makes the guide graph move randomly over time.  When we guide we are not correcting for seeing conditions we are correcting for error in Polar Alignment and in periodic error of the main RA worm gear.  Guiding on seeing changes can actually make your stars and image resolution worse. Therefore we want the guide corrections to be effective but not overly so.  To help average seeing we use longer guide exposures over several seconds sometimes to average the blob that is being measured. 


Lets focus on Declination first.  This is because the rms error for dec is that due to Polar alignment, seeing, and corrrections.  At any time if we have dec guiding tuned properly and assume we have good enough polar alignment, this number should be really close to the practical limit we can achieve due to seeing conditions.  Therefore this should be the first parameter to tune and minimize as we will use this as a guide to set RA.  Its important to tune Dec so corrections mostly are made to correct for polar alignment error.  This will ALWAYS be in one direction north or south and will automatically switch after a meridian flip.  Once you figure out the trend you can set the dec mode to north or south to keep the trend in check. You can lower Dec aggression down to the minimum and watch the graph. The red line will eventually drift up or down the rate of which will depend on how good your polar alignment is.  Select north or south dec mode and see if the rate increases or decreases. You may need to put dec aggression back to 50% or more to see this effect more quickly.

Once you have the mode set, now we can focus on aggression.  Remember we just want to correct for the trend.  If the aggression is too low the trend line will drift away slowly as it did before.   If aggression is too high the correction will cause the line to overshoot the zero line.  If dec mode auto were selected we might see a correction in the opposite direction.  For this we just watch the line.  The correction should not cause it to cross zero line by much.  It takes some trial and error to get this right. But take some time to practice and watch what happens when aggression is set really high and really low so you can spot the error quickly.

Once declination is ironed out its time to tackle the RA setting.  There are more things that can go wrong here but the process is similar with a catch.  Note the rms error we previously obtained in Dec tuning.  Don't worry too much about the number. Just note that we want RA to be about the same as close as we can get.  Since RA is always correcting one way or the other we want to start by moving from 50% aggression to 5 or 10%.  If you see that RA pulses are happening in the same direction a lot one after another then it means it can’t get the line back to zero and the aggression needs to be increased.  Work it back up a bit and wait for the line to come back to zero.  If the aggression is too low you will see multiple corrections in the same direction.  If the aggression is too high you will see a corrective pulse and then immediately a pulse in the opposite direction. Its better if the first one falls a bit short and a smaller second one takes it to zero.  You will see the overshoot happen once in a while even on a properly tuned guide.  But it should be random and seldom.  There should be nothing on the guide graph that looks like a pattern.  If there is, your aggression is likely too high. 

So now that you have things tuned, you can now increase your guide exposure to 2-4s.   This takes some trial and error.  A well tuned mount can take 4s or more but some just have too much periodic error or stiction to tolerate that long period without a guide pulse.  As you go from 1s to longer exposures you may need to choose a new guide star or reduce the gain as the bright ones will start to clip.  You will almost certainly notice that as you increase your exposure, the rms error starts to drop as there are fewer corrections due to seeing.

Now the catch.  Nearly every worm gear in existence has what is called periodic error.  The worm gear in the RA axis rotates once every few minutes.  Mine has a 10 minute cycle.  This has an impact on tracking, guiding, and rms error.  Its best to watch the guide graph over a 10 minute period to make sure the aggression is high enough to correct for the error.  This has a limiting effect on the rms error value that you can obtain.  You may not be able to match the Dec rms error because your aggression must be increased to compensate.  To further complicate it, a long guide exposure may not be able to detect the start of this error soon enough to correct in time.  Its something  you have to watch for before you start imaging.  Understand how your RA works over the full cycle of the worm gear so you don't have any surprises. Better mounts have hand picked gears to minimize this effect. 

Some mounts have what is called PPEC or permanent periodic error correction.  This is a learned cycle of the worm and can be played back within the motor controller to correct for periodic error. It requires the hand controller to be operational.  However, PPEC is not compatible with INDI which is what is used on the ASIAir.  Some have had success but its believed to be a disaster waiting to happen.  I have witnessed conflicts using PPEC.  The issues are a matter of timing.  You can either get a double corrected guide pulse or a software glitch which turns tracking off in the hand controller.  Either way its a disaster to any imaging session.  Either use PPEC by itself or just use ASIAir guiding with PPEC disabled.  Just a note that there are some limited ASCOM drivers designed to allow both to work.  ASCOM requires a PC to control everything and at this time there are no INDI drivers that safely allow the use of PPEC with PHD2.

I hope this sheds some light on getting the aggression settings set properly.  With some practice you can quickly get these settings adjusted based on the current seeing conditions.  Just remember we are always seeing limited and one session to the next can have vastly different settings and results. Take some time to practice during full moon and eventually you will master these settings.


Modifying the ASIAir Default Startup Settings

 V1.5.3

On occasion some users may need to change the default start up behavior on the ASIAIR or ASIAIR Pro. ZWO has made this possible through the modification of the "ASIAIR_Config.txt" file. The settings are the same across all ASIAIR platforms and versions.

Before attempting to do this there are some things to know. First and foremost, before attempting any manual modification of the config file you should ensure you have made a successful backup image of the card as well as copied off the "zwoair_license" file to a safe place. DO NOT SKIP MAKING A BACKUP FIRST.

The ASIAIR Backup and Restore procedures are located in the ASIAIR users manual located here:

https://astronomy-imaging-camera.com/manuals-guides

Lastly to perform this operation you need to insert the SD card into your PC in order to edit the configuration file. Because ASIAIR uses a linux based operating system all but one of the file systems on the card will show as corrupted or say they need formatting. DO NOT FORMAT ANY OF THESE PARTITIONS. Just click cancel through all of these, there should be only 3 or 4 pop ups to cancel.

Now that you have a backup and have avoided formatting the card, we can begin. On the Boot filesystem, normally assigned to E: but could be something else if E: was already assigned by your operating system, there will be a file called "ASIAIR_Config.txt". You should edit this with only "Notepad". The file contains the following entries:

#ASIAIR boot config file

#ASIAIR boot as 2.4GHZ WiFi if set to 1

AP_boot_24G=0


#ASIAIR 5G channel,36 or 149

AP_5G_channel=36


#ASIAIR 2.4G channel, range: 1-11

AP_24G_channel=11


#AP SSID and password will be reset to default value if set to 1

AP_reset=0

Here is an explanation of each option and when you may find it necessary to change the option. Most people will never need to edit this file.

AP_boot_24G

This option controls what wifi speed is enabled when the device boots up. This is sometimes needed for older phones or tablets that do not support 5ghz wifi. Without changing this setting you would not be able to connect to the ASIAIR. Currently this option is really only useful if you have an Original ASIAIR. The Pro version starts up out of the box in 2.4ghz mode so should not need to be changed. This option however makes it possible to force this setting in the event it is changed to 5ghz accidentally or you always want the device to start up in 2.4ghz.

To force start up in 2.4ghz wifi change this option from 0 to 1.

AP_5G_channel

This option controls what channel the ASIAR uses when running in 5Ghz AP mode. The default is to use channel 36 which uses a lower frequency and therefore penetrates walls a bit better. The other option is to use channel 149. This provides a slightly higher data rate at the expense of needing a clear line of sight between the ASIAR and your phone or tablet.  It is important to note that the 802.11ac specification dictates that the higher frequencies use a higher output power to compensate for the extra weakening of going through walls and some types of coated glass.  If you have a direct line of site to your scope or use extenders you could benefit from using channel 149 instead.  Another possible need for this is if you have multiple 5Ghz wifi in your vicinity.  Changing this will allow them to better coexist in close proximity.

To change 5ghz wifi usage to channel 149 change this option from 36 to 149

AP_24G_channel

This option controls what channel ASIAIR uses when running in 2.4Ghz AP mode. The default is to use channel 11. If there are other 2.4Ghz Access Points in the area using this channel you may need to change this to something else in the range of 1 to 11 to avoid a conflict and connection failures.

To change 2.4ghz channel usage change this option from 11 to anything in the range from 1-11

AP_reset

This option is used to reset the SSID and the Wifi settings back to factory defaults in the event it has been changed and the device is no longer accessible.

To reset the wifi SSID and password back to factory default change this setting from 0 to 1

Once you have made any desired changes, save the file and exit notepad. It is important to make sure the SD card is properly and safely ejected before removing it from the computer. You can do this by right clicking the USB stick icon on your task bar and click "Eject SDHC Card". When prompted that it is safe to remove you can do so.

Carefully replace the SD card back into the ASIAR and the device will now boot with the desired settings. If the new settings enhance your experience, I would recommend making another backup image of the card to save time later if/when the need arises to reimage it.


Friday, February 19, 2021

Why does my ASIAir go nuts after polar alignment?


V1.5.3

ASIAir has a great polar alignment (PA) routine which can get you close enough to alignment with the north or south pole, as close as you could get with a polar scope, maybe better.  However while PA is necessary for great tracking and minimal guiding, you don't need to use the built in PA if you have another way of doing it such as with a polar scope.  For those that use it, you may occasionally notice that after using the PA tool and then do a goto the scope goes nuts and sometimes points down or approaches or hits the tripod or pier. 

While this is a dangerous situation you can either kill power to the mount or release the clutches until the show stops.  Obviously this is a bug that crops up from time to time.  So whats happening?  For some reason at times after PA, the ASIAir and/or mount driver loses track of where it is and a direct goto will send it to some strange location.  This issue has been reported and I encourage you to submit feedback via the app when the issue occurs so ZWO can review the logs. 

However, don't fret.  There is a workaround.  It was discovered if you don't use PA then the issue never surfaces.  You can still boot up and use PA to get your mount squared away.  However, when you have succeeded with PA, return the scope to the home position by hand, shutdown the asiair through the app, then power off the asiair and the mount.  Power everything back up and once connected via the app, go straight to a goto and plate solve a preview image.  The mount should operate as expected from here out. 

Once you obtain PA you don't need to go back in and do it again when restarting asiair.  Once its done, its done until you move or bump the mount enough to knock it off.

With some users we found that they did not have a clear view or Polaris or the automated rotation didn’t  move enough or it would go too far.  ASIAir does not need to see Polaris to work properly. The scope can be up to 30 degrees away from Polaris and PA will work just fine.  If the automated rotation doesn't work fo you, you can also do the rotation manually.  You have to turn off the mount driver in the app first then return to PA.  When the rotation step starts you will get a warning about turning on the mount.  Just cancel the warning and move the scope as instructed in RA then move to the next step.  This can also be done for non goto mounts like the Star Adventurer which only uses the On Camera ST4 driver.  However you also have to turn off the On Camera ST4 driver to complete a manual PA.

Once PA is completed manually return the scope to home position.  At this point i would recommend shutting down ASIAir and powering off both asiair and the mount then power them both back up.  If the mount does not automatically enable in the app you may need to manually turn on the driver.

You dont need to to go into PA again.  Just goto an object and do a plate solve to get things in sync.

We try as we may to squash bugs but this has been elusive.  Fortunately there is a workaround.   I hope this was helpful and look forward to seeing everyones images on the FB ASIAir group. 


ASIAir Exposure Calculation

There are quite a few guides out there that attempt to explain how to choose the optimal exposure for astrophotography.  Most are rather complicated to a beginner.  Since the ASIAir is supposed to make astrophotography easier lets explore this within the context of asiair. 

First though lets go over some basics.  By now you are likely familiar with stacking and with that the calibration frames that go with it, bias, darks, and flats.  For the sake of exposure calculation we will focus on bias.  What is Bias?  In a practical sense this is the absolute noise floor that an imaging sensor produces just to read the data from the sensor.  It has nothing to do with exposure and everything to do with the all of the analog to digital conversions and getting the data read quickly from the sensor.   I wont go into the technical details here.  We use a bias exposure to determine the baseline from which to measure our exposures.  To take a bias frame you simply take an exposure with the shortest exposure time possible and the lens or telescope covered. 


So what?  Well ASIAir makes it easy to measure the noise floor exposure.  We call this the Average ADU value.  Its an average value of all of the pixels in the image.  Since bias is relatively flat across the sensor we can use this as starting point for our exposure. The average ADU value can be read right on the preview information screen as AVG.  This value will change at different gain settings so you may want to make a chart.

We can use this same AVG value to measure our target images or light frames.  In all cases we are all skyglow limited so when we expose our light frame the AVG value is almost always the skyglow with the minimum AVG value being our bias noise.  For some large objects this value can be skewed slightly higher but in general this is the limit of detail that you can record at your location.


The rule of thumb is to expose your target light frames to about 400-600 AVG ADU above the bias level for monochrome cameras abs about 1200 above for color cameras.  Why so much higher for color cams?  Its because of the introduction of the bayer matrix over the mono sensor to create red green and blue pixels.  I wont go into the details here but most CMOS color cams use an RGGB quad of pixels to give your color representation.  There are two green pixels for every red and blue.  We therefore really need to expose for those single color pixels and to compensate for the color filter we have to expose about 2 to 3 times higher in ADU.

Why not just expose much higher and adjust later in processing?  In astro imaging we want to preserve as much dynamic range as possible but expose the image high enough so we can get our skyglow far enough above the bias noise that we can absolutely send that noise to black in our final image and be able to process the fine detail higher above it.  We also want to preserve as much star color as possible so its a balance between preserving star color and getting the bias noise down to black away from our subject.

If you live in highly light polluted areas you will find that using this method gives you really short exposures.  This is about all you can record given the skyglow you have.  In those instances you can add filters to block light pollution.   The same method holds true with filters.  Once you reach your target AVG ADU then recording longer will only clip your stars.

These are just starting values and depending on the filters you may never get to the AVG ADU value for skyglow within a reasonable amount of time.  Trial and error will give you an idea of where you need to be.  Make notes on the AVG ADU values that work best with each filter and use that as your basis.

I hope this helps get you started and gives you an idea of how to determine the optimal exposure for location and setup.  ASIAir makes it easy to calculate exposure and the AVG value should be your goto metric to determine that.


Monday, February 15, 2021

ASIAir Dithering


 V1.5.3

So for my first post here I'm going to start with dithering.  We see a lot of questions come up on the FB forum regarding how to set up dithering on the ASIAir.  Dithering is an important tool used to randomize fixed sensor noise and prepare sub frames for better statistical averaging and noise reduction during stacking and processing. Dithering is commonly used to eliminate what is called walking noise but it also helps improve signal to noise in general by ensuring that any fixed noise elements are not part of the signal being recorded. Walking noise is noise in the background that shows as lines or streaks due to poor polar alignment and from minor defects in imaging sensors. It often manifests itself in images that have not been exposed long enough or have low signal to noise due to excessive light pollution. Dedicated astro cameras have much less noise to start with and therefore suffer less from this effect than DSLRs. DSLRs require heavy amounts of dithering to suppress walking noise in final stacked images. Dithering, randomly moves the image by a set number of pixels so that stacking software can better reject the noise when using noise rejection options such as Sigma or Windsorized Sigma Clipping.

Dithering is accessed and configured under "Guide Settings" within the ASIAir app. There are four main settings that require adjustment based on your camera type, degree of mount backlash, and seeing conditions.

Pixels - This is the number of pixels that the image will be randomly shifted between exposures. The range is 1-10 pixels. Most dedicated astro cams can benefit from 1-3 pixels in movement. However DSLRs require the max between each frame to properly eliminate walking noise.

Stability - This setting is the required distance in seconds of arc that the target must be within after a dither before beginning the settlement period. In order to determine this setting you need to watch your guide graph for a while and determine what the current seeing conditions will allow. For example, if your guide graph is regularly swinging between +1" and -1" than your stability would be 2" which is the distance covered between 1 and -1 through the zero line. You should set this parameter just higher than your noted stability. In this example a stability of 3" should be used.

As another example, if the stability on your guide graph is varying between 0.5" and -0.5" then your stability is 1". Your stability setting should be set for 2". One setting higher than what you observed.

You can use a lower setting but in doing so you may not reach a point where guiding will resume as your stability will rarely be within the range selected long enough. It should never be set below your observed stability as shown on your guide graph or imaging may never resume.

Settle Time - This setting is the time that must pass once the guiding is within the stability distance configured. The guide must remain within the stability distance for the set period of time before the imaging sequence will continue. For example the guide graph is regularly varying between 1" and -1" on the guide graph and a stability of 3" is configured along with a settle time of 3s. Once dithering has moved the image by the desired number of pixels, guiding will move out of the range but slowly settle back into the range 1 to -1. Once the guide has moved within that range the settle time will start counting down. If the guide moves back out of the stability range, the countdown will reset and wait for guiding to move back into the range. Once guiding has stabilized between 1" and -1" and has remained there for 3 seconds, the imaging sequence will resume.

The desired settle time is mainly based on how much backlash exists in your mount and how quickly it can recover and stabilize. A well tuned mount can begin guiding after 1s has passed. A poorly tuned mount with a lot of backlash may take longer to clear. If it takes more than 15s to settle then dithering should be disabled until the backlash between the gears can be corrected.

Timeout - If the dither doesn't settle out for one reason or another, this sets the maximum time it will wait before starting the next exposure.  It is always good to set this to something reasonable like 60s.

Interval - This is the number of images that can be taken before dithering is executed. It is always good to dither after every frame but with some astro cams it may not be needed every frame. For DSLRs, the interval should always be set to 1 such that every frame is dithered.

RA Only - This option is really only useful when using a tracking platform that only guides in RA via ST4.  This allows those mounts to dither in one axis which can drastically improve the signal to noise ratio.

Dithering is an important tool to help noise reduction algorithms eliminate fixed noise in stacked images. There is generally no additional consideration needed during processing to benefit from this other than to make sure you are using Sigma Clipping or Windsorized Sigma Clipping during stacking. There is no cost to using it other than a few extra seconds between exposures. The benefits far out way the extra time needed and should be used if your mount allows it every time you image.


How To Do a Factory Reset with ASIAir